Self Hosting with Cloudflare Tunnels & Docker Compose
In this guide I will do my best to explain how you can use free Cloudflare tunnels with your self hosted services & Docker Compose so you can access them via your own Domain.
Before we continue I am going to assume the following.
- You have a VPS or some server, upon which you run your services.
- You have already purchased a Domain
- Idealy you should do this through Cloudflare
- You already have Docker and Docker Compose installed upon your server.
- How to do this can be found here
- The service which you wish to host is already Dockerised.
Please ensure all these apply before continuing.
What is a Cloudflare tunnel?
Put simply, a Cloudflare Tunnel is a service that allows you to securely connect your web servers or other resources to Cloudflare without exposing them directly to the internet. Instead of using a public IP address, a lightweight daemon called cloudflared creates outbound-only connections to Cloudflare's global network.
Why do you want do this?
Essentially the internet is a scary place for your servers. Whenever you host a service on the internet such as a personal website, some fancy WebUI for a self hosted service or even a game server, you're inevitably giving the entire world access to your server through it which opens you up to attacks from bad actors.
This setup helps protect your servers from direct attacks, such as DDoS attacks and data breaches, by ensuring that all traffic is filtered through Cloudflare's security measure.
How to set this up for yourself.
Above I mentioned I will be writing this guide assuming you have purchased a Domain through Cloudflare, as such you should already have a cloudfalre account. If this is not the case for you then the first step to getting this setup is to make yourself a free account on Cloudflare and ensure the nameservers for your domain are set to those of Cloudflare.
I will not be explaining how to setup your domain with cloudflare via another provider because it varies depending on where you purchased your domain from.
However here is a guide for doing so with a service like Namecheap:
How to set up DNS records for your domain in a Cloudflare account
Setting up the Docker Compose stack.
In this example I am going to be using the helloworld-http docker container. If you wish to follow along to get a basic understanding of how things work then feel free to use the same container as I am. You can replace this container with your own if you wish, everything else within the Docker Compose file will remain the same.
Start by making a new folder for our Docker Compose stack on your system and inside it create a docker-compose.yml file and add in the service which you wish to host.
version: '3'

services:
  helloworld:
    image: strm/helloworld-http
    restart: unless-stopped
Take note that even though this is a web service and is running inside the container on port 80, we do not need to open any ports. This is part of the beauty of using this method to host our services.
Next we want to define a network and add our service into that network, this step is completely optional as one will be generated for you anyway but I have found it to be good practice to define it for yourself.
version: '3'

services:
  helloworld:
    image: strm/helloworld-http
    restart: unless-stopped
    networks:
      helloworld-network:

networks:
  helloworld-network:
    driver: "bridge"
Next we can add our Cloudflared service to this stack, to do this we will need a token so the cloudflared service can connect to our tunnel. Head over to your Cloudflare dashbaord and on the left side menu navigate to Zero Trust and open up the Networks panel.
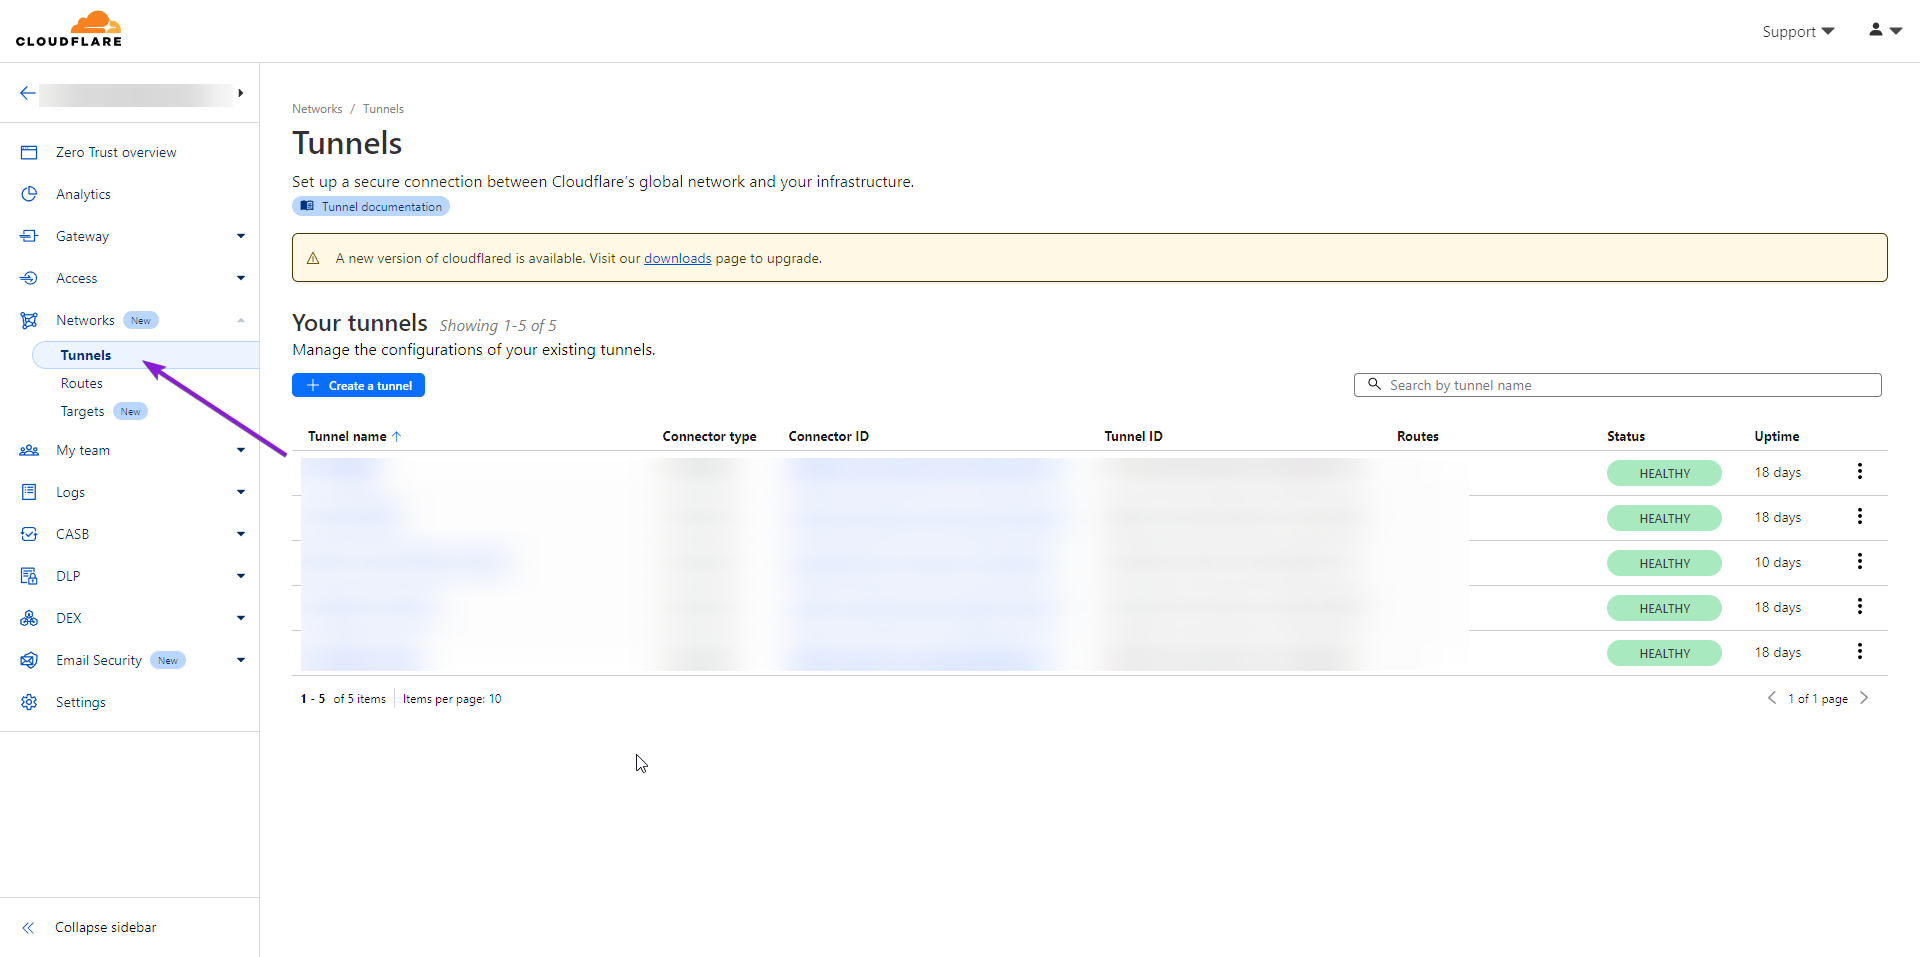
On here you will see the option to create a new tunnel. Click that and select the Cloudflared option. Give your tunnel a name, I am going to call it Example Tunnel but you can call it whatever you wish, then select Save Tunnel.
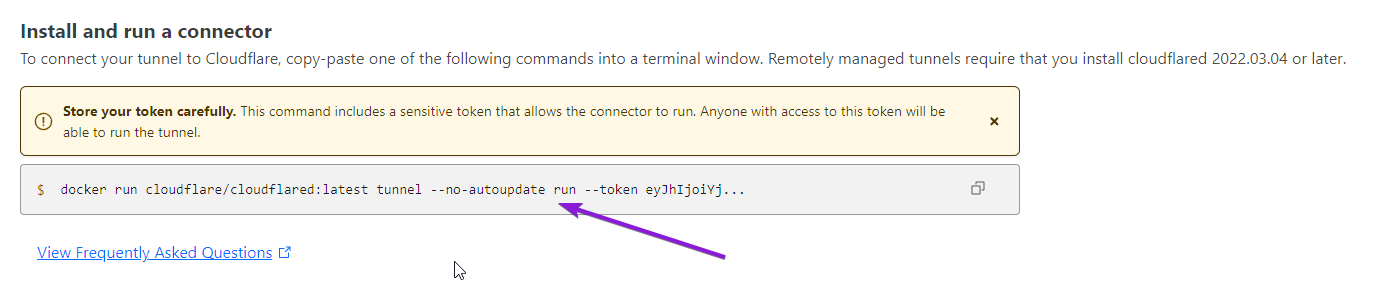
You should now be presented with a new page for configuring your tunnel. It will have buttons near the top for the different deployment methods such as Windows, Mac, Debian, Redhat and Docker, select Docker and you will be presented with the Install and run a connector command for deploying with Docker. Click inside the section to copy the command as show below and paste it into a notepad or somewhere you can view the whole command string.
Please DO NOT close the Configure page for your cloudflared tunnel
You should have something like the following
docker run cloudflare/cloudflared:latest tunnel --no-autoupdate run --token TTlTCNhDoI01nWEb1FgomMhNxViEj0WldTWMwIiGYTw0NUXQpVTpXAlIcDrSWON24FqLttUa3TSxp5OJme4imI2jNceBTZEIUZTN4y0Iy1BZSRJqynZjjiYY2UZ0IIiZlM6UkWZLNVT9Ym5NjmhZOYNp41VjMGNUiMiEkBZ1ZtWUMZ1MtJMY2jaT
The only thing we need from this is the token. So copy out the token and keep it handy. (Do not save it anywhere, we want to delete after we have added it to our service in Docker Compose)
Now back inside the folder for your Docker Compose stack create a new file named .env and open it up in a text editor, this is where we're going to store our Cloudflared token. The format you want to use is the following:
CF_TOKEN=2IIIY1G1ETmxTIiUF1NVZlNl2N1BlYQ0VyMC1SV0WkRUZZYTZZTBmqa2ZNaoi0pMZYiZJWNNe4IUN0eWjNNtjITi4rEjjZgITLM6p5kihiJcUyZjTNTUBUUDM0VSOwxmpMhMAWL9EqOMojdlIWTcZy4wTtbmDT2nStm1E4XJYY5iFGOjWXM3npht
Save and close that file.
Now inside our docker-compose.yml file we can add the Cloudflared service. We also add a startup control to our main service using depends_on because we want to ensure that the cloudflared container starts up before any services that depend on its tunnel. Also note that the token for this tunnel is automatically going to be loaded from the .env file we created earlier.
version: '3'

services:
  helloworld:
    image: strm/helloworld-http
    restart: unless-stopped
    depends_on:
      - cloudflared
    networks:
      helloworld-network:

  cloudflared:
    image: cloudflare/cloudflared:latest
    command: tunnel --no-autoupdate run
    environment:
      - TUNNEL_TOKEN=${CF_TOKEN}
    restart: unless-stopped
    networks:
      helloworld-network:

networks:
  helloworld-network:
    driver: "bridge"
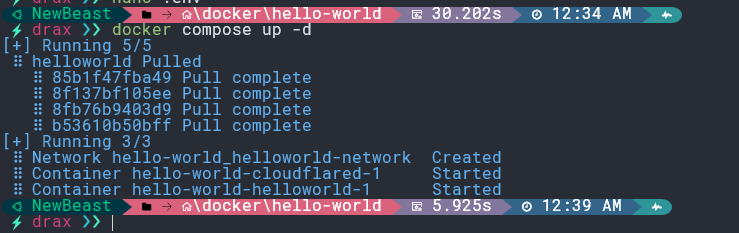
That's our docker stack completely setup. Save the file and from the terminal spin up the compose stack. docker compose up -d or docker-compose up -d. You may need to use sudo.
All being well you should see your containers spin up on your server without issue.
Now head back to your Cloudflared Configure page and you should notice you now have a Connector towards the bottom of the page, it should have an ID and the status should be connected.

Click Next in the bottom right hand corner.
Now comes the real magic of Cloudflared. You should be presented with the Route Traffic page. This page is essentially where we route any DNS request (in my example I am going to be routing the domain hello-world.draxcorp.uk to the service within my docker compose stack.
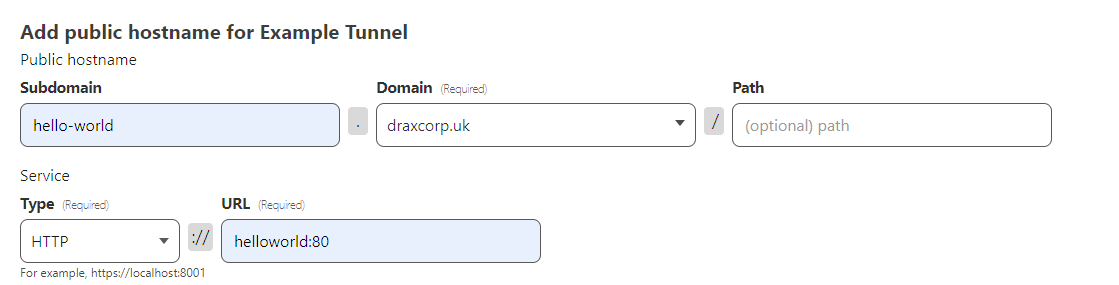
So in the first box enter in a sub domain if you wish to use one, in my example I am going to use hello-world. In the second box select the domain name you should have added to cloudflare at the start of this guide, in my case I have draxcorp.uk added to cloudflare so I will select that one. You can also add a path if you wish but I have no need for that in this example but it works pretty much exactly how you imagine it might.

The lower inputs are for our service running inside our docker compose stack. Here we can define what type of service is running, in my case it's a http server, in your case it may be different so select as appropriate from the list.
For the URL you may think here we want to add the local IP address of the bridge network we created and you most certainly can, however one of the nice things about Docker is that it automatically sets up DNS entries for us locally within the compose stack so instead of having to look through our network devices on the server and finding the IP for this stacks network, we can instead just use the name of our service followed by the port within the container that our service is running on.
So in this example we defined the container for our helloworld-http service as helloworld in our docker-compose.yml file and if we check back to the documentation for our helloworld-http container, we can see that it runs on port 80. Of course if you didn't follow along with the example I showed and instead added your own service to the Compose then simply use the service name you gave that instead and use the port that service is running on.
Now you should have something that looks like the following.
Click on the save tunnel button in the bottom right and you're done. Your tunnel should now show on the Your Tunnels page and should display that it is healthy. If you're using cloudflares DNS servers on your local machine (1.1.1.1) then you should be able to go straight to the URL you setup for the tunnel and it will display the page for your service. If you followed along and used the example container it should look like this
Note that sometimes it can take a little time for new DNS entries to propagate so if it doesn't load right away but everything else shows it as being healthy then don't worry, just give it a little time and try access it again.
You may also notice that Cloudflare has automatically assigned a certificate for your service and it's now using https even though the service we setup in the container was http. This is part of the security you get when using cloudflared tunnels to publically host your services.
Now all traffic between your server and the internet for this service is being directed and secured by Cloudflare. You can add more services to the compose stack too if you so wish, you can setup more tunnels if you wish too, all for free.
One caveat to this though that you may have already been wondering about is regarding speed and data transfer. All your traffic for the service on the cloudflared tunnel is going through said tunnel so while it will be incredibly fast, do be aware that using this method to host services that do a lot of data transfer such as file sharing services or media streaming services are going to run into speed issues. Cloudflared is NOT a service you should use if the service you're going to be hosting has to send or recieve very large amounts of data. You also should most certainly not use this to host things like Media Servers such as Plex or Jellyfin, to secure those sorts of services you should think about running your own local tunnel with something like Wireguard.
Thanks for reading and I hope you found this helpful.
If you have questions regarding anything in the post or find I have made a mistake anywhere or something needs updating, please contact me via Discord @draxis.
Also feel free to Join The Programmers Hangout where you can get help with topics like these. The Programmers Hangout Discord